Tips and Tricks for Succesful Soldering
Author: Louisa Logan
Soldering can be imagined as micro-welding in which pieces of metal are joined together using a filler material i.e. solder (an alloy of tin and lead) at low temperature. Taking time to carefully and skilfully solder electric components ensures that circuits work first time round. A sloppy rushed soldering job will only have you going back to make corrections. Here you will learn a great technique for soldering success.
Components you will need
- Soldering Iron - (25-40W is used for Printed Circuit Boards). Its tip is usually nickel plated.
- Soldering wire - Its thickness depends on the type of work you are carrying out. Usually 18 gauge wire is used in electronic circuit work. It is usually made up of SN-63 (37% lead and 63% tin).
- Soldering stand - This holds the soldering iron when not in use. The soldering iron gets very hot and its good safety practice to use a soldering stand.
- PCB board or a properly drilled Vero board
- LED Lights or any other electronic component
- Safety goggles
Safety precautions you need to be aware of
- Safety goggles should be worn to protect the eyes from fumes from the melted solder which may cause irritation.
- Do not hold the soldering iron on the copper tracks for more than 5 seconds. When heated it can reach a temperature of nearly 400-500 °C and may damage your design.
- When not in use the soldering iron must be placed in its stand so that no electrical, physical or mechanical damage may result.
- While soldering take
care that none of the copper tracks are short circuited
by the molten solder. If so, remove the short circuited
path and solder again.
 Placing the components
correctly
Placing the components
correctly
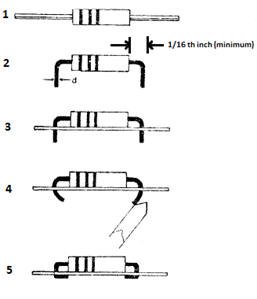
The following figure illustrates such a process.
- Place the component to be soldered. Take care while placing the LED; the longer end is the anode. Polarity matters!
- Properly bend the component into place.
- Insert the component in to the PCB.
- Bend the component leads and press them towards the PCB.
- This is how the component should look on the PCB. Now it is ready for soldering.
Soldering
This soldering technique ensures a firm, bright metallic, sound joint that is free from flakes. It can be applied to any electronic component that needs soldered.
- Clean the circuit board with alcohol.
- Touch the tip of the soldering iron to the areas around the joint. This heats up your copper track (Do not do this for more than 5 seconds otherwise the copper track will get damaged)

- Place the soldering wire near the soldering iron and move it over the joint in a small circle until it reaches back to the soldering iron.
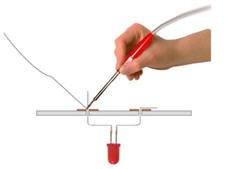
- Melt just enough solder to make the joint and then pull the iron away. The molten metal should cover all the elements of the joint.
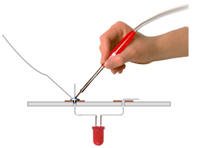
- Remove the soldering wire and then the iron.
A good soldered joint uses the optimum amount of solder and is uniformly spread without any protrusions. Consider the following scenarios of some good and bad soldering practices.

Louisa Logan works as an engineer at
Element 14
Farnell, a company specialising in high quality
electronic components. She enjoys making her own
electronic projects and teaching her nephews about
electronic circuits.